移动开发实验2:RecycleView和Activity跳转

First Post:

Last Update:

Word Count:
2.6k

Read Time:
13 min

Page View: loading...

AS类微信界面开发

功能要求

1、在任一tab页中实现列表效果;本功能的实现需要使用 recycleview;

2、将recyclerView的每个item增加点击功能,点击后跳转到一个新的view展示信息

开发技术

开发工具:as

版本:API 24 Android 7.0

思路分析

本次实验目的是实现在任一tab页将recyclerView的每个item增加点击功能,点击后跳转到一个新的view展示信息,固需要采用到以下两点技术

  1. 列表的实现需要使用控件recyclerView进行操作,需创建一个单独的放置recyclerview的layout——item.xml文件,另外还需要单独创建每一项的具体内容的layout文件——fragment_txl.xml
  2. fragment或activity之间的跳转实现采用startActivity(),新版本中如果还需要返回内容可以采用registerForActivityResult()方法,并采用launch()方法进行跳转

总体思路为在layout创建item.xml文件放recyclerview控件,fragment_txl.xml放列表每一项的信息。在txlfragment定义初始化信息并将信息写成数组方便传参,配合Myadapter适配器进行使用,跳转的具体方法采用startActivity()进行跳转,在跳转的详情页面txlDetails接受传过来的intent并显示数据,设置返回按钮用于返回。

设计过程

1. 编写layout

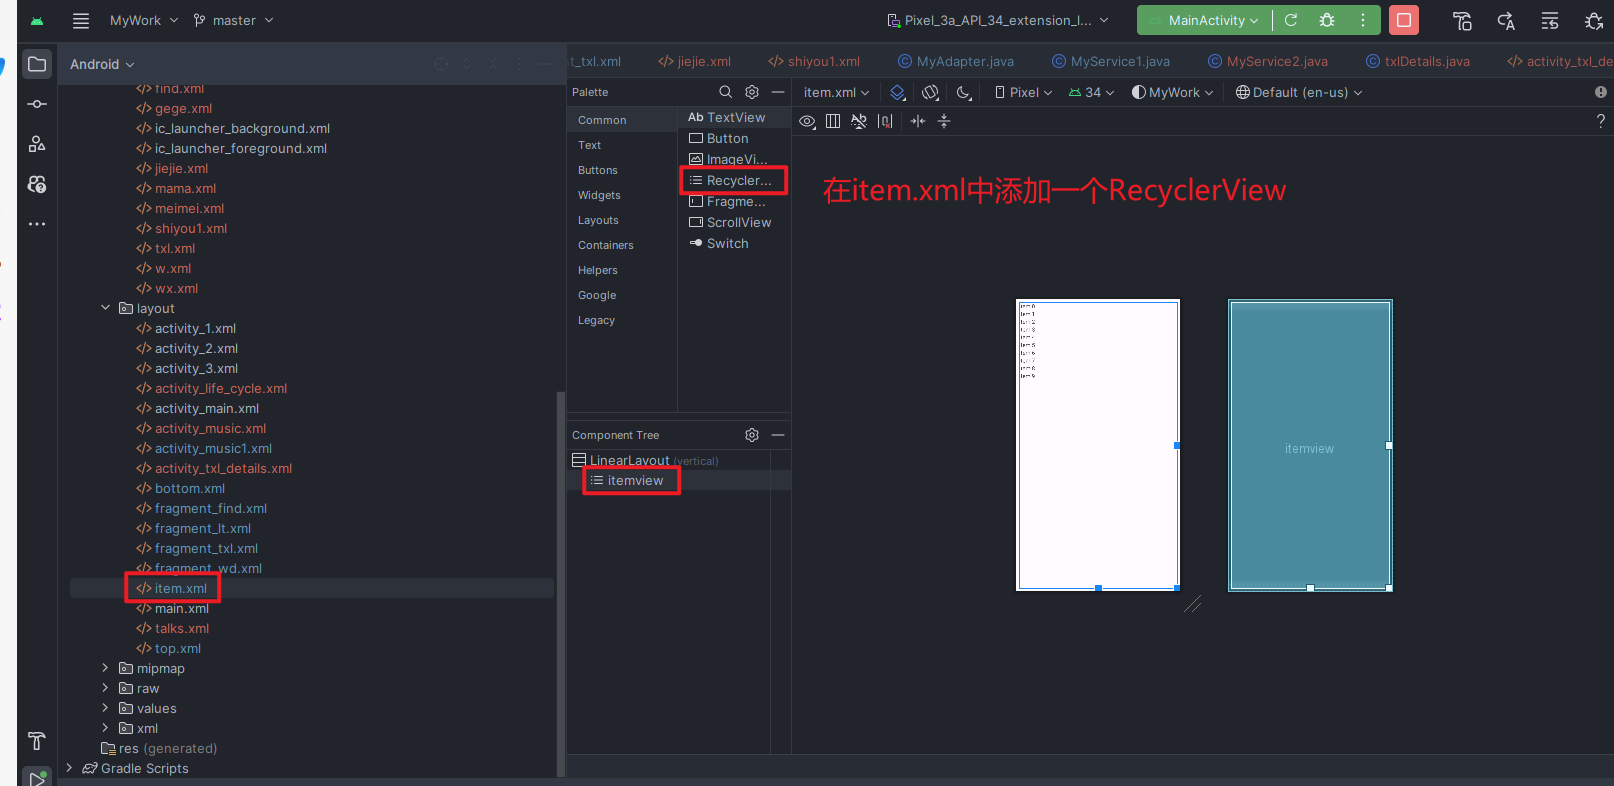
1.1 在新建的item.xml中添加recycleview

效果

image.png

代码

1
2
3
4
5
6
7
8
9
10
11
12
13
14
15
<?xml version="1.0" encoding="utf-8"?>
<LinearLayout xmlns:android="http://schemas.android.com/apk/res/android"
android:layout_width="match_parent"
android:layout_height="match_parent"
android:orientation="vertical">

<androidx.recyclerview.widget.RecyclerView
android:id="@+id/itemview"
android:layout_width="match_parent"
android:layout_height="match_parent"
android:layout_marginStart="8dp"
android:layout_marginTop="8dp"
android:layout_marginEnd="8dp"
android:layout_marginBottom="8dp" />
</LinearLayout>

创建了一个RecyclerView,命名为itemview

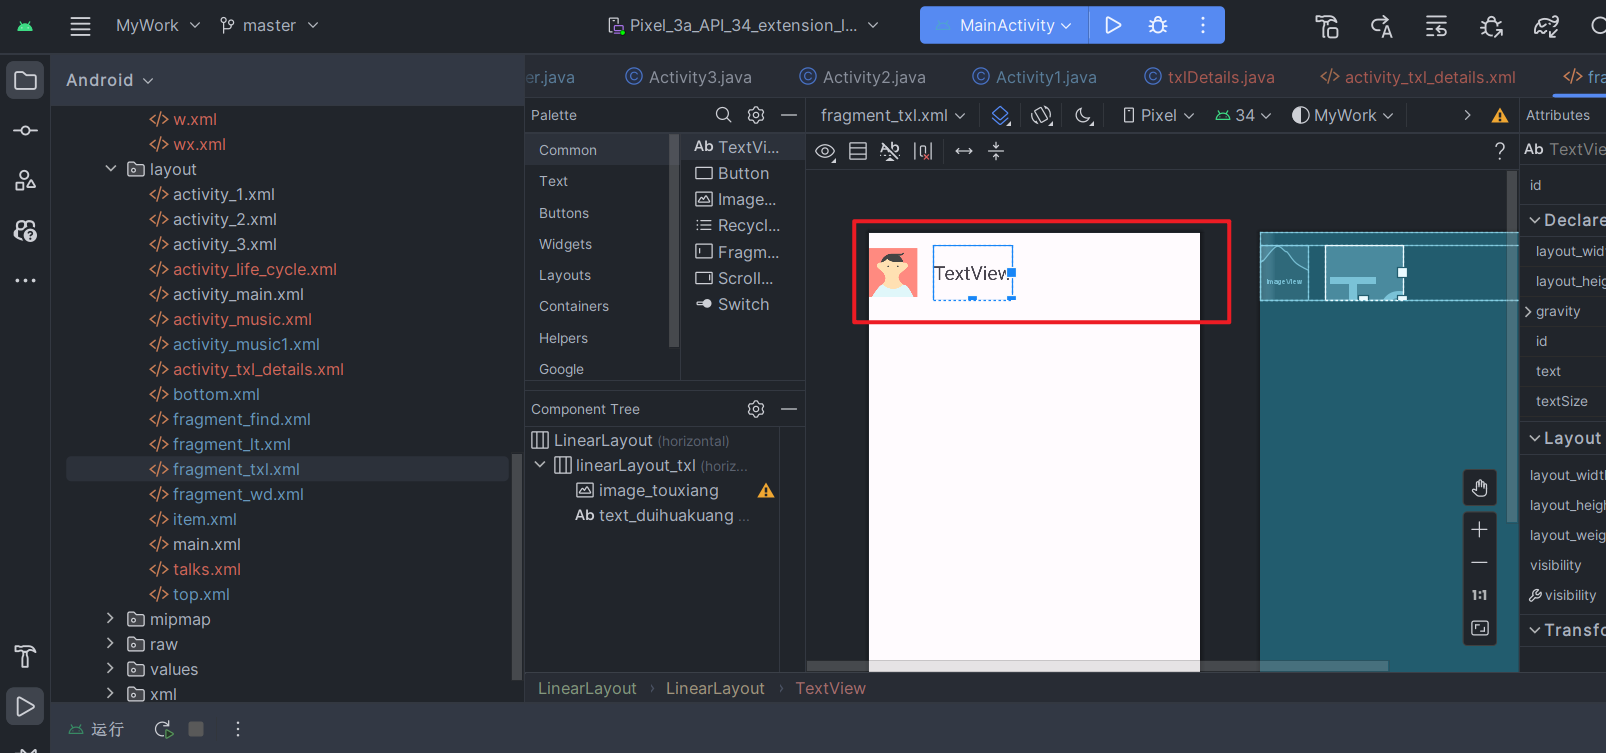
1.2 在fragment_txl.xml中实现每一项的信息

效果

image.png

代码

1
2
3
4
5
6
7
8
9
10
11
12
13
14
15
16
17
18
19
20
21
22
23
24
25
26
27
28
29
30
31
<LinearLayout xmlns:android="http://schemas.android.com/apk/res/android"
xmlns:app="http://schemas.android.com/apk/res-auto"
xmlns:tools="http://schemas.android.com/tools"
android:layout_width="match_parent"
android:layout_height="wrap_content">

<LinearLayout
android:id="@+id/linearLayout_txl"
android:layout_width="match_parent"
android:layout_height="wrap_content"

android:layout_marginTop="15dp">

<ImageView
android:id="@+id/image_touxiang"
android:layout_width="60dp"
android:layout_height="68dp"
android:layout_marginRight="20dp"
android:layout_gravity="left|center_vertical"
tools:srcCompat="@tools:sample/avatars" />

<TextView
android:id="@+id/text_duihuakuang"
android:layout_width="wrap_content"
android:layout_height="match_parent"
android:gravity="left|center_vertical"
android:text="TextView"
android:textSize="24sp" />
</LinearLayout>

</LinearLayout>

用一个Linearlayout包含了一个ImageView和TextView,方便后续点击跳转

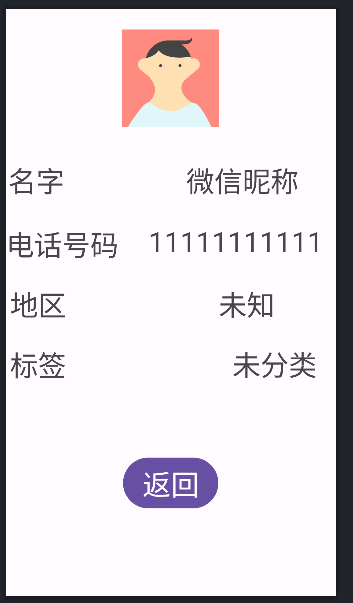
1.3 实现跳转详情页面activity_txl_details.xml的内容

效果

image.png

代码

1
2
3
4
5
6
7
8
9
10
11
12
13
14
15
16
17
18
19
20
21
22
23
24
25
26
27
28
29
30
31
32
33
34
35
36
37
38
39
40
41
42
43
44
45
46
47
48
49
50
51
52
53
54
55
56
57
58
59
60
61
62
63
64
65
66
67
68
69
70
71
72
73
74
75
76
77
78
79
80
81
82
83
84
85
86
87
88
89
90
91
92
93
94
95
96
97
98
99
100
101
102
103
104
105
106
107
108
109
110
111
112
113
114
115
116
117
118
119
120
121
122
123
124
125
126
127
128
129
130
131
132
133
134
135
136
137
138
139
140
141
142
143
144
145
146
147
148
149
150
151
152
153
154
155
156
157
158
159
160
161
162
163
164
165
166
167
168
169
170
171
172
173
174
175
176
177
178
179
180
181
182
<?xml version="1.0" encoding="utf-8"?>
<androidx.constraintlayout.widget.ConstraintLayout xmlns:android="http://schemas.android.com/apk/res/android"
xmlns:app="http://schemas.android.com/apk/res-auto"
xmlns:tools="http://schemas.android.com/tools"
android:layout_width="match_parent"
android:layout_height="match_parent"
android:orientation="vertical"
tools:context=".txlDetails">

<TextView
android:id="@+id/WeChatname"
android:layout_width="wrap_content"
android:layout_height="wrap_content"
android:layout_weight="1"
android:text="名字"
android:textStyle="bold"
android:textSize="35sp"
app:layout_constraintBottom_toBottomOf="parent"
app:layout_constraintEnd_toEndOf="parent"
app:layout_constraintHorizontal_bias="0.008"
app:layout_constraintStart_toStartOf="parent"
app:layout_constraintTop_toTopOf="parent"
app:layout_constraintVertical_bias="0.275" />

<LinearLayout
android:id="@+id/linearLayout"
android:layout_width="411dp"
android:layout_height="wrap_content"
android:orientation="horizontal">

</LinearLayout>

<LinearLayout
android:id="@+id/linearLayout2"
android:layout_width="411dp"
android:layout_height="wrap_content"
android:orientation="horizontal">

</LinearLayout>

<LinearLayout
android:id="@+id/linearLayout3"
android:layout_width="411dp"
android:layout_height="wrap_content"
android:orientation="horizontal">

</LinearLayout>

<LinearLayout
android:id="@+id/linearLayout4"
android:layout_width="411dp"
android:layout_height="wrap_content"
android:orientation="horizontal">

</LinearLayout>

<Button
android:id="@+id/returnButton"
android:layout_width="wrap_content"
android:layout_height="wrap_content"
android:layout_marginTop="408dp"
android:text="返回"
android:textSize="35sp"
app:layout_constraintTop_toBottomOf="@+id/imageDetail"
tools:layout_editor_absoluteX="146dp" />

<TextView
android:id="@+id/wxtag"
android:layout_width="wrap_content"
android:layout_height="wrap_content"
android:layout_marginTop="24dp"
android:layout_weight="1"
android:textStyle="bold"
android:text="标签"
android:textSize="35sp"
app:layout_constraintTop_toBottomOf="@+id/region"
tools:layout_editor_absoluteX="5dp" />

<TextView
android:id="@+id/wxtag2"
android:layout_width="wrap_content"
android:layout_height="wrap_content"
android:layout_marginStart="188dp"
android:layout_weight="1"
android:textStyle="bold"
android:gravity="center"
android:text="未分类"
android:textSize="35sp"
app:layout_constraintBottom_toBottomOf="parent"
app:layout_constraintEnd_toEndOf="parent"
app:layout_constraintHorizontal_bias="0.441"
app:layout_constraintStart_toEndOf="@+id/wxtag"
app:layout_constraintTop_toTopOf="parent"
app:layout_constraintVertical_bias="0.611" />

<TextView
android:id="@+id/region"
android:layout_width="141dp"
android:layout_height="wrap_content"
android:layout_marginTop="24dp"
android:layout_weight="1"
android:textStyle="bold"
android:text="地区"
android:textSize="35sp"
app:layout_constraintTop_toBottomOf="@+id/phoneNumber"
tools:layout_editor_absoluteX="5dp" />

<TextView
android:id="@+id/region2"
android:layout_width="wrap_content"
android:layout_height="wrap_content"
android:layout_weight="1"
android:gravity="center"
android:text="未知"
android:textSize="35sp"
android:textStyle="bold"
app:layout_constraintBottom_toBottomOf="parent"
app:layout_constraintEnd_toEndOf="parent"
app:layout_constraintHorizontal_bias="0.773"
app:layout_constraintStart_toStartOf="@+id/region"
app:layout_constraintTop_toTopOf="parent"
app:layout_constraintVertical_bias="0.501" />

<ImageView
android:id="@+id/imageDetail"
android:layout_width="154dp"
android:layout_height="121dp"
android:layout_weight="1"
app:layout_constraintBottom_toBottomOf="parent"
app:layout_constraintEnd_toEndOf="parent"
app:layout_constraintHorizontal_bias="0.498"
app:layout_constraintStart_toStartOf="parent"
app:layout_constraintTop_toTopOf="parent"
app:layout_constraintVertical_bias="0.042"
tools:srcCompat="@tools:sample/avatars" />

<TextView
android:id="@+id/phoneNumber"
android:layout_width="wrap_content"
android:layout_height="wrap_content"
android:layout_marginTop="28dp"
android:layout_weight="1"
android:gravity="center"
android:textStyle="bold"
android:text="电话号码"
android:textSize="35sp"
app:layout_constraintTop_toBottomOf="@+id/WeChatname"
tools:layout_editor_absoluteX="0dp" />

<TextView
android:id="@+id/phone"
android:layout_width="wrap_content"
android:layout_height="wrap_content"
android:layout_marginStart="36dp"
android:layout_weight="1"
android:text="11111111111"
android:textSize="35sp"
app:layout_constraintBottom_toBottomOf="parent"
app:layout_constraintEnd_toEndOf="parent"
app:layout_constraintHorizontal_bias="0.058"
app:layout_constraintStart_toEndOf="@+id/phoneNumber"
app:layout_constraintTop_toTopOf="parent"
app:layout_constraintVertical_bias="0.388" />

<TextView
android:id="@+id/textDetail"
android:layout_width="wrap_content"
android:layout_height="wrap_content"
android:layout_marginStart="152dp"
android:layout_weight="3"
android:gravity="center"
android:text="微信昵称"
android:textStyle="bold"
android:textSize="35sp"
app:layout_constraintBottom_toBottomOf="parent"
app:layout_constraintEnd_toEndOf="parent"
app:layout_constraintHorizontal_bias="0.0"
app:layout_constraintStart_toEndOf="@+id/WeChatname"
app:layout_constraintTop_toTopOf="parent"
app:layout_constraintVertical_bias="0.275" />

</androidx.constraintlayout.widget.ConstraintLayout>

设置了一些基础信息

2. 核心代码实现

2.1 在txlFragment里面实现了初始化操作,并生成数据数组,创建RecycleView实例和设置Adapter

代码

1
2
3
4
5
6
7
8
9
10
11
12
13
14
15
16
17
18
19
20
21
22
23
24
25
26
27
28
29
30
31
32
33
34
35
36
37
38
39
40
41
42
43
44
45
46
47
48
49
50
51
52
53
54
55
56
57
58
59
60
61
62
63
64
65
66
67
68
69
70
71
72
package com.example.mywork;

import android.content.Context;
import android.content.Intent;
import android.graphics.Color;
import android.os.Bundle;
import android.view.LayoutInflater;
import android.view.View;
import android.view.ViewGroup;
import android.widget.LinearLayout;

import androidx.activity.result.ActivityResult;
import androidx.activity.result.ActivityResultCallback;
import androidx.activity.result.ActivityResultLauncher;
import androidx.activity.result.contract.ActivityResultContracts;
import androidx.annotation.NonNull;
import androidx.fragment.app.Fragment;
import androidx.recyclerview.widget.ItemTouchHelper;
import androidx.recyclerview.widget.LinearLayoutManager;
import androidx.recyclerview.widget.RecyclerView;

import java.util.ArrayList;
import java.util.Collections;
import java.util.HashMap;
import java.util.List;
import java.util.Map;

public class txlFragment extends Fragment {
//获取recyclerView对象并且实例化适配器
private RecyclerView recyclerView;
private MyAdapter myAdapter;
LinearLayout linearLayout;

@Override
public View onCreateView(LayoutInflater inflater, ViewGroup container,
Bundle savedInstanceState) {
// Inflate the layout for this fragment
//return inflater.inflate(R.layout.fra_lx, container, false);
View view;
//存所有控件的视图
view=inflater.inflate(R.layout.item, container, false);
//调用recycleview控件
recyclerView=view.findViewById(R.id.itemview);
linearLayout=view.findViewById(R.id.linearLayout_txl);
//创建数据
String[] names={"Pappy","Mommy","Sister","Little Sister","Brother","Little Brother","Roommate"};
int[] images={R.drawable.baba,R.drawable.mama,R.drawable.jiejie,R.drawable.meimei,R.drawable.gege,
R.drawable.didi,R.drawable.shiyou1};
String[] phones={"123456789","123456789","123456789","123456789","123456789",
"123456789","123456789"};
String[] regions={"四川 南充","四川 南充","四川 南充","四川 南充","四川 南充","四川 南充","湖北 武汉"};
String[] tags={"家人","家人","家人","家人","家人","家人","同学"};
List<Map<String,Object>> items=new ArrayList<Map<String,Object>>();
for(int i=0;i<names.length;i++){
Map<String,Object> item=new HashMap<String, Object>();
item.put("i_name",names[i]);
item.put("i_image",images[i]);
item.put("i_phone",phones[i]);
item.put("i_region",regions[i]);
item.put("i_tag",tags[i]);
items.add(item);
}
//创建RecycleView实例和设置Adapter
Context context=getContext();
myAdapter=new MyAdapter(items,context);
LinearLayoutManager manager=new LinearLayoutManager(context);
manager.setOrientation(recyclerView.VERTICAL);
recyclerView.setLayoutManager(manager);
recyclerView.setAdapter(myAdapter);
return view;
}
}

2.2 Myadapater 实现跳转操作

1
2
3
4
5
6
7
8
9
10
11
12
13
14
15
16
17
18
19
20
21
22
23
24
25
26
27
28
29
30
31
32
33
34
35
36
37
38
39
40
41
42
43
44
45
46
47
48
49
50
51
52
53
54
55
56
57
58
59
60
61
62
63
64
65
66
67
68
69
70
71
72
73
74
75
76
77
78
79
80
81
82
83
84
85
86
87
88
89
90
91
package com.example.mywork;
import android.content.Context;
import android.content.Intent;
import android.os.Bundle;
import android.util.Log;
import android.view.LayoutInflater;
import android.view.View;
import android.view.ViewGroup;
import android.widget.ImageView;
import android.widget.LinearLayout;
import android.widget.TextView;

import androidx.activity.result.ActivityResult;
import androidx.activity.result.ActivityResultCallback;
import androidx.activity.result.ActivityResultLauncher;
import androidx.activity.result.contract.ActivityResultContracts;
import androidx.annotation.NonNull;
import androidx.recyclerview.widget.RecyclerView;

import java.util.List;
import java.util.Map;

public class MyAdapter extends RecyclerView.Adapter <MyAdapter.MyViewHolder>{
//定义存储数据和运行环境的变量
private List<Map<String,Object>> mydata;
private Context mycontext;

//获取数据和运行环境
public MyAdapter(List<Map<String,Object>> data, Context context){
mydata=data;
mycontext=context;
}

@NonNull
@Override
public MyViewHolder onCreateViewHolder(@NonNull ViewGroup parent, int viewType) {
View view= LayoutInflater.from(mycontext).inflate(R.layout.fragment_txl,parent,false);
MyViewHolder holder=new MyViewHolder(view);
return holder;
}

@Override
public void onBindViewHolder(@NonNull MyAdapter.MyViewHolder holder, int position) {
String name=mydata.get(position).get("i_name").toString();
int image=Integer.parseInt(mydata.get(position).get("i_image").toString());
//获取详情页面中某个联系人的对应数据
String phone=mydata.get(position).get("i_phone").toString();
String region=mydata.get(position).get("i_region").toString();
String tag=mydata.get(position).get("i_tag").toString();
holder.textView.setText(name);
holder.imageView.setImageResource(image);

//添加点击事件
holder.linearLayout_txl.setOnClickListener(new View.OnClickListener() {
@Override
public void onClick(View v) {
//点击后跳转到联系人详情页
Intent intent=new Intent(mycontext, txlDetails.class);

//使用bundle传值
Bundle bundle = new Bundle();
bundle.putString("details",name);
bundle.putInt("image", image);
bundle.putString("phone",phone);
bundle.putString("region",region);
bundle.putString("tag",tag);

intent.putExtras(bundle);
mycontext.startActivity(intent);
}
});
}

@Override
public int getItemCount() {
return mydata.size();
}
public class MyViewHolder extends RecyclerView.ViewHolder {
public LinearLayout linearLayout_txl;
private TextView textView;
private ImageView imageView;
public MyViewHolder(@NonNull View itemView) {
super(itemView);
//获取item中的控件id
textView=itemView.findViewById(R.id.text_duihuakuang);
imageView=itemView.findViewById(R.id.image_touxiang);
linearLayout_txl=itemView.findViewById(R.id.linearLayout_txl);
}

}
}

跳转的实现主要是对于LinearLayout_txl 的点击动作实现一个监听,具体操作 Intent intent=new Intent(mycontext, txlDetails.class) myContext是一个代表当前Activity的上下文对象。txlDetails.class是目标Activity的类名。然后将数据压缩绑定到bundle里面,添加到intent,最后调用startActivity(intent) 进行跳转

2.3 txlDetails

1
2
3
4
5
6
7
8
9
10
11
12
13
14
15
16
17
18
19
20
21
22
23
24
25
26
27
28
29
30
31
32
33
34
35
36
37
38
39
40
41
42
43
44
45
46
package com.example.mywork;

import androidx.appcompat.app.AppCompatActivity;

import android.content.Intent;
import android.os.Bundle;
import android.util.Log;
import android.view.View;
import android.widget.Button;
import android.widget.ImageView;
import android.widget.TextView;

public class txlDetails extends AppCompatActivity {
TextView dName,textView1,textView2,textView3;
ImageView dImage;
Button button_r;
@Override
protected void onCreate(Bundle savedInstanceState) {
super.onCreate(savedInstanceState);
setContentView(R.layout.activity_txl_details);
//获取上一个Actvity传过来的intent
Intent intent=getIntent();
dName=findViewById(R.id.textDetail);
dImage=findViewById((R.id.imageDetail));
//根据intent获取得到的数据设置item控件的值
dImage.setImageResource(intent.getIntExtra("image",R.drawable.find));
dName.setText(intent.getStringExtra("details"));
textView1=findViewById(R.id.phone);
textView2=findViewById(R.id.region2);
textView3=findViewById(R.id.wxtag2);
textView1.setText(intent.getStringExtra("phone"));
textView2.setText(intent.getStringExtra("region"));
textView3.setText(intent.getStringExtra("tag"));
button_r=findViewById(R.id.returnButton);
button_r.setOnClickListener(new View.OnClickListener() {
@Override
public void onClick(View view) {
Log.d("fb","button_r....");
Intent intent = new Intent();
setResult(777,intent);
finish();
}
});

}
}

用于接受来自txlFragment传过来的数据并显示数据,设置了返回button用于返回至跳转前的Activity

结果展示

4.gif

代码仓库

https://github.com/Kylinxin/MyWork

总结

​ 本次实现我完成了RecyclerView的实现,明白了如何对recyclerView进行传参,设置每一项的具体样子。同时对Activity跳转有了更清晰的认识,startActivity(intent);通过intent设置了跳转对象,进行跳转,这种方法简单直观,但是没办法处理返回值,老版本的解决方法是采用方法startActivityForResult()进行解决,但是有许多弊端和RequestCode难以处理,新版本中采用了registerForActivityResult()方法通过在使用registerForActivityResult()方法注册ActivityResultContracts.StartActivityForResult时,处理启动Activity并获取返回结果的逻辑。ActivityResultCallback是一个接口,用于处理ActivityResultLauncher的结果回调。当启动的Activity结束并返回结果时,回调方法中的ActivityResult参数将包含返回的结果信息。总的来说思路非常清晰,但是我也发现了一个问题,那就是在myadater中无法使用这种方式进行跳转,后来查找原因,registerForActivityResult()只能在fragment或activity中才能使用。这次收获满满,加深了我对recyclerView的使用和activity间跳转的用法和差异。

—— 2023.11.7